OpenWRT on a Raspberry Pi 3 using a Netcomm NF4/NF18 modem as bridge device
Preamble
This is less a blog post but more or less of a reference for myself in 3 years when I need to set this up again for whatever reason.
A high level diagram of what will be the resulting network
FttB Modem Port 1
        |
      eth1 (DHCP)
        |
      OpenWrt
        |
      eth0 (192.168.20.1/24)
        |
5 port switch
- My home network operates on 192.168.20.0/24
- OpenWrt will have an IP address of 192.168.20.1
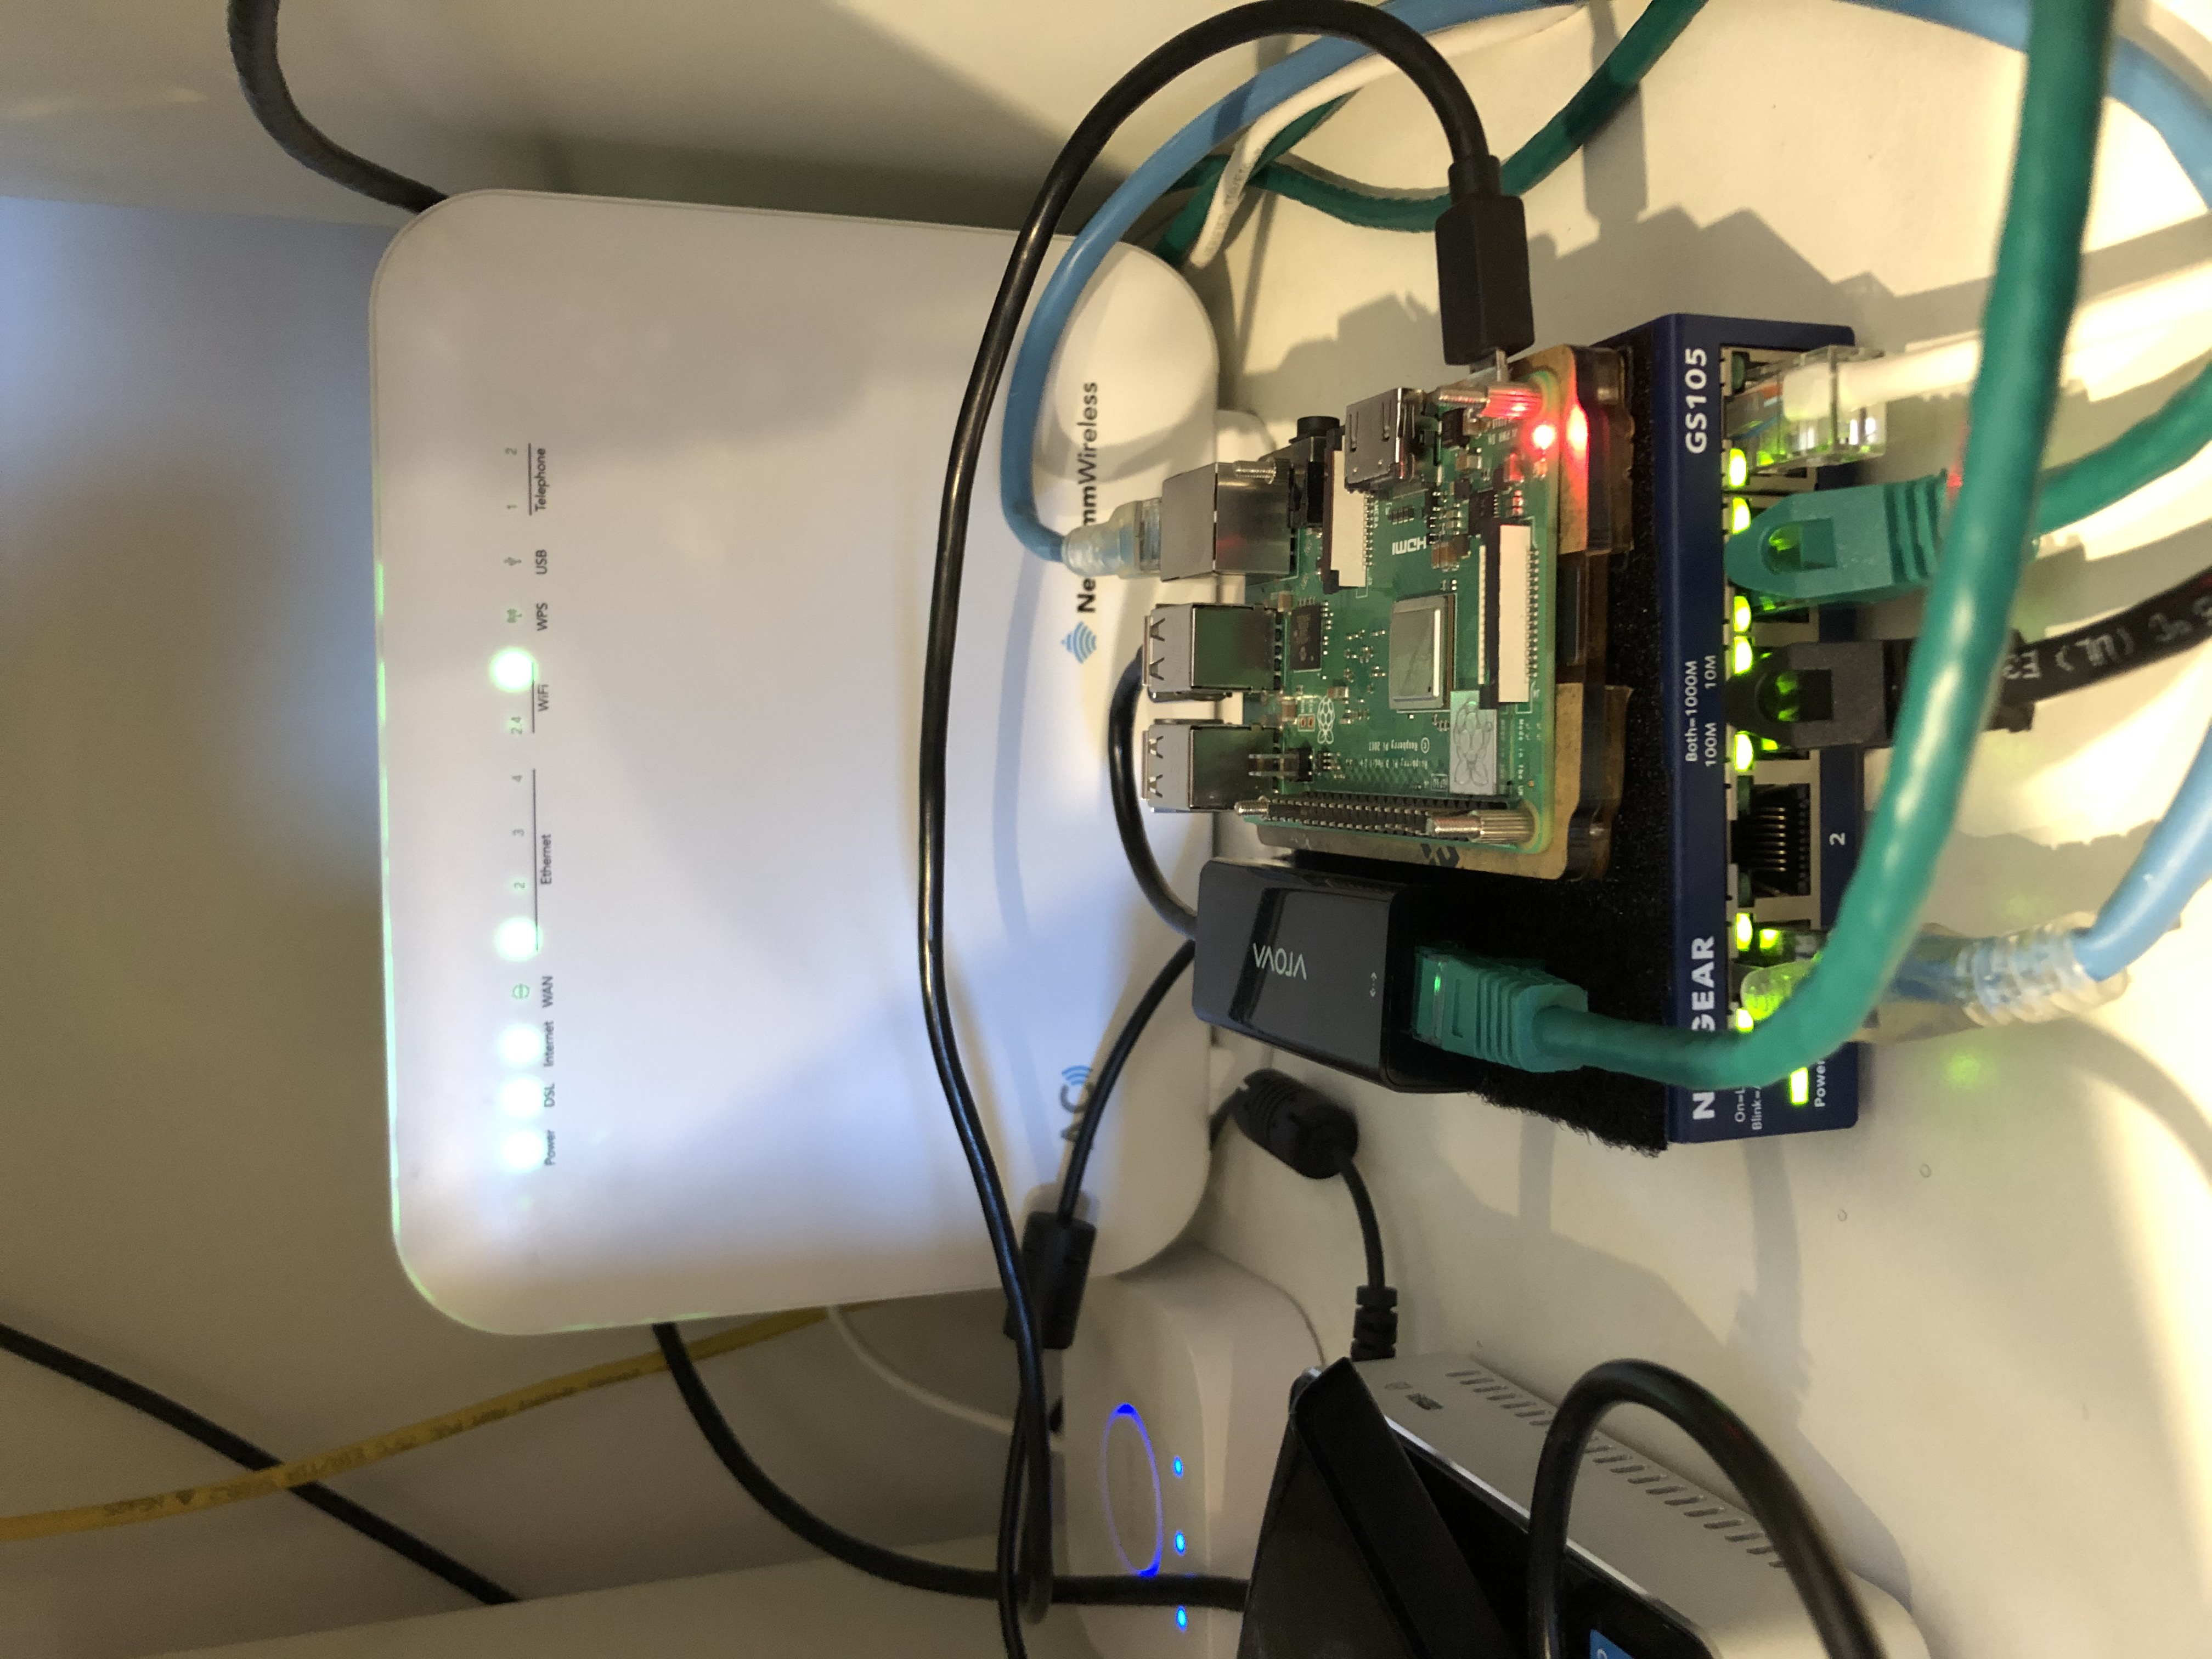
- eth1 will be connencted to my Netcomm NF18xxx modem (DHCP) [0]
- eth0 will be connected to my 5 port Netgear switch
[0] My ISP’s modem simply bridges the FttB network and provides me an IP over DHCP which makes life simple. YMMV with your ISP (eg. A lot of ISP’s will use PPPoE), see bottom of page for more detail on my setup specific to my ISP (Aussie Broadband).
Requirements
Download the firmware for the Pi here: https://openwrt.org/toh/raspberry_pi_foundation/raspberry_pi
- Rasperry Pi (I am using a Pi 3 Modeb B+, I do have a Pi 4 but the only firmware available is the snapshot release)
- Supported USB dongle (I am using an RTL8152 based USB to Ethernet adapter, ax88179 based chipsets are a popular choice)
- OpenWRT flashed onto an SD Card
Note Any Pi that has a current release (aka, not a snapshot only like the Pi 4 currently) should work just fine using this guide.
After flashing
Expand the SD card to use the entire space. I would also suggest that you only use SD card as a bootloader and run OpenWRT on a good quality USB stick (for reliability), but alas, out of the scope of this post (and well documented on the internet here and here if you’re keen on using the Pi 4)
Getting internet access to the OpenWRT
Booting your Pi for the first time, OpenWrt will give you a default IP of 10.0.0.1. If this works with your current network configuration you can move forward, otherwise, you’ll will need to set the main ethernet interface up to for internet access in order to install some required packages.
Assuming your current working router has an IP address of 192.168.1.1 (as is the case with my Netcomm NF4) and your network has a subnet of 192.168.1.0/24, you should edit /etc/config/network to something like the following:
config interface 'lan'
    option type 'bridge'
    option ifname 'eth0'
    option proto 'static'
    option netmask '255.255.255.0'
    option ip6assign '60'
    option ipaddr '192.168.1.2' # This will be the initial IP Address for OpenWrt
    option gateway '192.168.1.1' # This is your current routers address
    list dns '8.8.8.8'
Restart networking
/etc/init.d/network restart
or just reboot your pi.
ssh into the OpenWrt and confirm it has access by pinging google.
Installation of required packages
By default (at least at the time of writing), the required USB Ethernet packages are not included in the default image, thus we need to install them.
- SSH into OpenWrt
ssh root@192.168.1.2
- Start by updating OpenWrt’s respository
root@OpenWrt:~# opkg update
- Let’s find the required package for our USB to Ethernet Adapter (Assuming we’re using the RealTek rtl8152 based adapter, similar should apply to ax88179 based adapters)
root@OpenWrt:~# opkg list kmod-usb-net* | grep rtl8152
kmod-usb-net-rtl8152 - 4.14.221-1 - Kernel module for USB-to-Ethernet Realtek 8152 USB2.0/3.0 convertors
- Install the required package
root@OpenWrt:~# opkg install kmod-usb-net-rtl8152
- We can either modprobe the driver or just reboot the pi.
root@OpenWrt:~# reboot
- Confirm the kernel module worked and there is an interface for us to use
root@OpenWrt:~# ip a
...
3: eth1: <BROADCAST,MULTICAST,UP,LOWER_UP> mtu 1500 qdisc fq_codel state DOWN qlen 1000
...
Update the network configuration
Now that all the interfaces are (hopefully) working as anticipated, we can begin to set up OpenWrt as an actual router.
Make the required changes to /etc/config/network to match your network configuration.
config interface 'loopback'
option ifname 'lo'
option proto 'static'
option ipaddr '127.0.0.1'
option netmask '255.0.0.0'
config globals 'globals'
option ula_prefix 'fd0b:3f6f:34bc::/48'
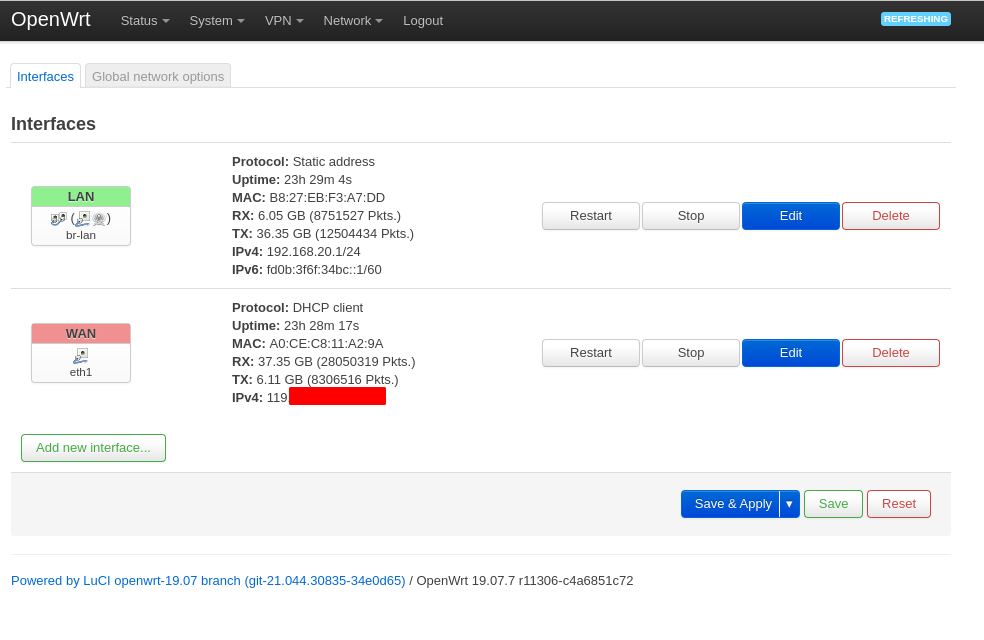
config interface 'lan'
option type 'bridge'
option ifname 'eth0'
option proto 'static'
option netmask '255.255.255.0'
option ip6assign '60'
option ipaddr '192.168.20.1'
list dns '8.8.8.8'
config interface 'wan'
option ifname 'eth1'
option proto 'dhcp'
Restart networking
root@OpenWrt:~# /etc/init.d/network restart
With any luck, you should have a working router powered by a Raspberry Pi running OpenWrt!
Installing LuCi webgui
root@OpenWrt:~# opkg install luci-ssl-nginx
and enable nginx
root@OpenWrt:~# /etc/init.d/nginx enable
Navigate to http://192.168.20.1 (or whatever IP address you set for OpenWrt)
Setting up the NF18 to bridge FttN/B connection
This is the part where YMMV, but this is a working setup for my Modem/ISP (Aussie Broadband)
-
Remove the existing WAN connection via Advanced Setup -> Wan (Interface should be called ptm0.1 or similar)
-
Creating a new WAN connection on ptm0.1 and select the “bridge mode” option. The defaults should be fine. Resulting interface should look like:

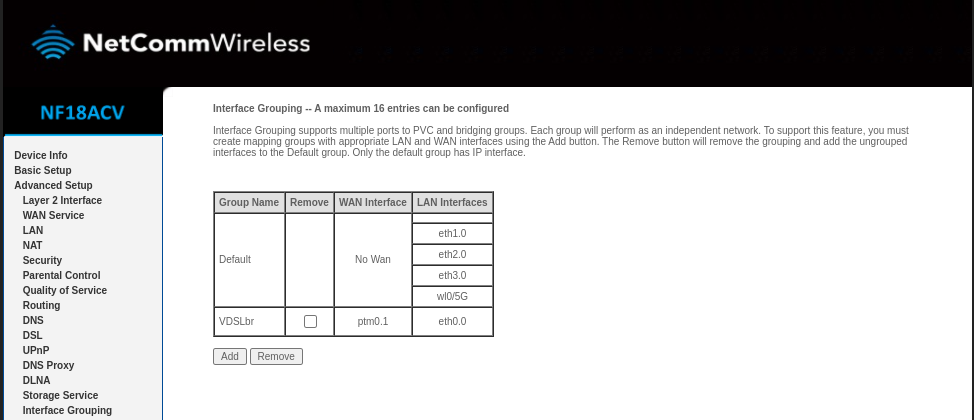
- Bridge one of the ethernet ports to the ptm0.1 interface via Advanced Setup -> Interface Grouping and connect that port to you WAN/USB Ethernet dongle
- With any luck, OpenWrt should get a public IP address from the WAN eth1 port. If you’re having issues on AussieBroadband accessing the internet even with a public IP, it may be necessary to kick your connection via the AussieBroadband customer portal.